Thanks to: John Haasl
How to Add Pico-8 To RetroPie
Introduction
The Pico-8 Fantasy Console is a great way to play, share and even create 8-bit style games that happen to run perfectly on the GPi Case! Below are the steps I went through in order to get this setup and configured on my GPi Case.
For this you will probably need some basic understanding of UNIX and how to navigate and run commands. Doing this is all up to you and I’m not responsible if something goes awry or messes up your device. Again, these were my steps to getting this installed, UNIX guru’s or a chimp at the zoo might have a better, more efficient way to do this!
If you have any comments or suggestions please pass them along to me on my social media pages:


Recommended Software and tools:
-
Pico-8 Software
-
FTP Transfer software to connect to the Raspberry Pi - WinSCP for Windows, Cyberduck for MacOS
-
Terminal SSH software: PuTTY for Windows
-
Simple DirectMedia Layer (SDL) Source - https://www.libsdl.org/download-2.0.php (
SDL2-2.0.10.zipat the time this was written)
Install PICO-8:
- Purchase the Pico-8 Fantasy Console
- (FTP) Download the Raspberry Pi version and transfer the
pico-8folder to the RetroPie home directory on your Raspberry Pi. You should now have a folder path that looks like/home/pi/pico-8 - (FTP or SSH) create a dummy shell script called
Start PICO-8.shand save it to the/home/pi/pico-8directory. This will be the menu item you will see in RetroPie if you setup the theme to launch Pico-8 from the menu. - (SSH) run the following command to install wiringPI. Pico-8 needs this to interface with the GPi Case GPIO setup.
sudo apt-get install wiringpi - (SSH) We need to now setup the button controls for Pico-8 since they might not be mapped correctly as defaulted.
- (FTP) Download the SDL Source .zip file and extract the folder contents to the
/home/pi/pico-8. You should have a new subfolder that looks like/home/pi/pico-8/SDL2-2.0.10. If this guide is being used in the future, the path will look like whatever the latest SDL version is. - (SSH) Execute the following commands:
cd /home/pi/pico-8/SDL2-2.0.10/test sudo chmod 777 configure ./configure make controllermap - Run the following controller map command:
./controllermap 0 >> /home/pi/pico-8/sdl_controllers.txt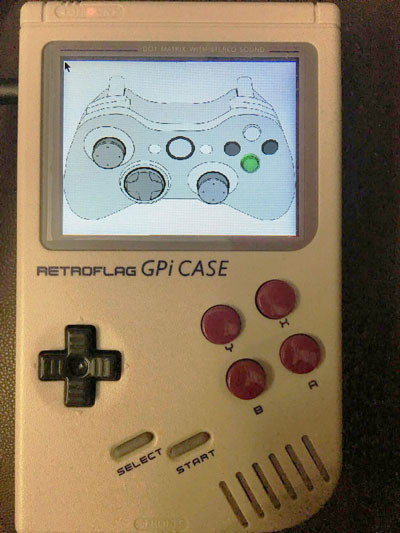
and follow the onscreen directions on your GPI Case, you should see an image like this on your screen. Push the appropriate button that matches the green highlighted one on your screen. For buttons you don’t have or that cannot be mapped (e.g. left/right analogue sticks or triggers), just push B. You should be able to map the B, A, Y, X, D-pad, L/R shoulder, start and select buttons.
- This should create a new file called
sdl_controllers.txtunder the/home/pi/pico-8/directory. - (SSH) Run the following command to remove the SDL folders. Remember, your SDL folder might be a different version so substitute the SDL folder name for the name in your pico-8 directory.
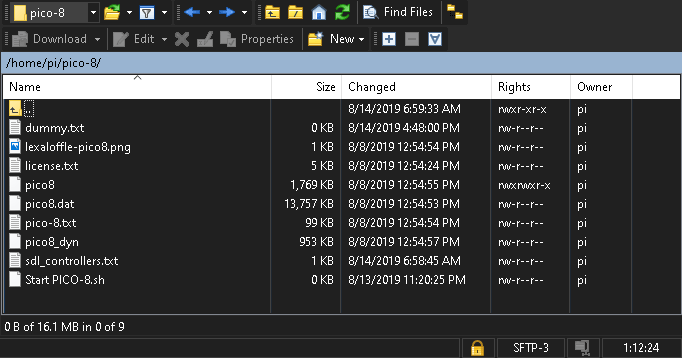
rm -rf ~/pico-8/SDL2-2.0.10a - After going through the steps above, you should be left with a pico-8 folder that looks like the following:
Add PICO-8 to the Emulationstation menu:
- (SSH) Run this command and add an entry for the Pico-8 system to be recognized by Emulationstation:
sudo nano -w /opt/retropie/configs/all/emulationstation/es_systems.cfg - Copy/Paste the following lines to the file. This can be placed anywhere in the file where you see other similar system entries. When done, press ctrl+x and answer
ywhen prompted toSave modified buffer. The entry is setup to add a menu item calledPico-8to the main Emulationstation menu. It’s looking for a .sh extension which is why we created theStart PICO-8.shas a dummy file to kick off the command which runs Pico-8!<system> <name>pico8</name> <fullname>PICO-8</fullname> <path>/home/pi/pico-8</path> <extension>.sh .SH</extension> <command>/opt/retropie/supplementary/runcommand/runcommand.sh 0 "/home/pi/pico-8/pico8 -splore"</command> <platform>pico8</platform> <theme>pico8</theme> </system> - You should have something that looks similar to the following:

-
(FTP) This part is harder. Depending on which theme you are using, you will need to add the graphic and any configuration file needed by the theme. The easiest way I found to do this is to (1) find the theme and then (2) copy a system folder that already exists and rename the copy to be
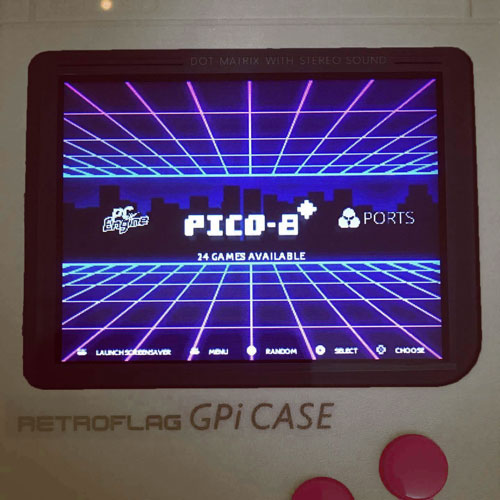
pico8and then (3) replace whatever images that are used with the them with Pico-8 images.For my example, I’m using the Super-Retroboy theme.
- Themes can be found in a few locations. Try looking for your theme in the following:
/opt/retropie/configs/all/emulationstation/themes/etc/emulationstation/themes
- Once you find your theme, copy an existing system folder and name it
pico8: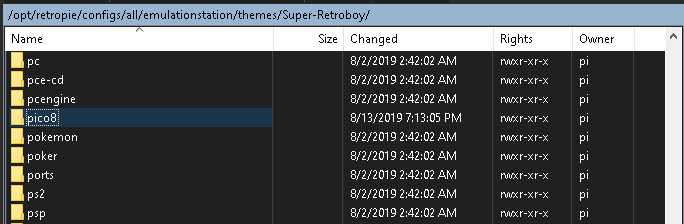
- For the Super-Retroboy theme, the only thing it uses is a custom
system.pngimage for the logo you see on the main Emulationstation menu. If you are using that theme, here is the image I used for mine. Save this image assystem.pngand copy it to the/opt/retropie/configs/all/emulationstation/themes/Super-Retroboy/pico8folder. (This image is included in the latest version of the theme already, you can also just update the theme) - Reboot your GPi Case and you should see Pico-8 on the menu. Select it and then select Start PICO-8 to run it!
Useful tips
- You need internet connection do download games from Pico-8 BBS. To make game work offline you need to favorite it.
- To quit Pico-8 press Start (Menu button) in Splore mode and select “Options -> Shutdown PICO-8”.